https://hackmd.io/@praveeng/6GMLAB-OAI-5G-SETUP-GUIDE
OAI 5G SA setup Guide - HackMD
Steps to setup OAI 5G SA and the following checklist.
hackmd.io
https://gitlab.eurecom.fr/oai/openairinterface5g/-/blob/develop/doc/NR_SA_Tutorial_OAI_CN5G.md
doc/NR_SA_Tutorial_OAI_CN5G.md · develop · oai / openairinterface5G · GitLab
Openairinterface 5G Wireless Implementation
gitlab.eurecom.fr
1. PC 구성
OAI RAN과 OAI Core를 한 시스템에 함께 설치하려면 PC 1대, 따로 설치하려면 PC 2대를 설치해야 한다.
PC 1대에 모든 시스템을 설치할 것.
시스템 사양은 아래와 같다.
| 운영체제(OS) | Ubuntu 22.04 LTS |
| CPU | 8 cores, x86_64 @ 3.5 GHz 이상 |
| RAM | 최소 32 GB |
| 하드웨어 타입 | Laptop / Desktop / Server 모두 가능 |
내 경우에는 윈도우에서 리눅스를 쓸 수 있는 wsl2 시스템에 Ubuntu 24.04 LTS를 설치해서 진행할 것. (Desktop)
2. OAI CN5G Setup 과정
2-1. 사전 준비
sudo apt install -y git net-tools putty

# https://docs.docker.com/engine/install/ubuntu/
sudo apt update
sudo apt install -y ca-certificates curl
sudo install -m 0755 -d /etc/apt/keyrings
sudo curl -fsSL https://download.docker.com/linux/ubuntu/gpg -o /etc/apt/keyrings/docker.asc
sudo chmod a+r /etc/apt/keyrings/docker.asc
echo "deb [arch=$(dpkg --print-architecture) signed-by=/etc/apt/keyrings/docker.asc] https://download.docker.com/linux/ubuntu $(. /etc/os-release && echo "${UBUNTU_CODENAME:-$VERSION_CODENAME}") stable" | sudo tee /etc/apt/sources.list.d/docker.list > /dev/null
sudo apt update
sudo apt install -y docker-ce docker-ce-cli containerd.io docker-buildx-plugin docker-compose-plugin

# Add your username to the docker group, otherwise you will have to run in sudo mode.
sudo usermod -a -G docker $(whoami)
reboot
2-2. OAI CN5G Configuration files
wget -O ~/oai-cn5g.zip https://gitlab.eurecom.fr/oai/openairinterface5g/-/archive/develop/openairinterface5g-develop.zip?path=doc/tutorial_resources/oai-cn5g
unzip ~/oai-cn5g.zip
mv ~/openairinterface5g-develop-doc-tutorial_resources-oai-cn5g/doc/tutorial_resources/oai-cn5g ~/oai-cn5g
rm -r ~/openairinterface5g-develop-doc-tutorial_resources-oai-cn5g ~/oai-cn5g.zip
2-3. OAI5G CN 도커 이미지 pull
cd ~/oai-cn5g
docker compose pull
3. OAI CN5G 실행
3-1. Start OAI CN5G
cd ~/oai-cn5g
docker compose up -d
3-2. Stop OAI CN5G
cd ~/oai-cn5g
docker compose down
4. OAI gNB and OAI UE Seutp
4-1. OAI gNB 사전 준비
# https://files.ettus.com/manual/page_build_guide.html
sudo apt install -y autoconf automake build-essential ccache cmake cpufrequtils doxygen ethtool g++ git inetutils-tools libboost-all-dev libncurses-dev libusb-1.0-0 libusb-1.0-0-dev libusb-dev python3-dev python3-mako python3-numpy python3-requests python3-scipy python3-setuptools python3-ruamel.yaml

git clone https://github.com/EttusResearch/uhd.git ~/uhd
cd ~/uhd
git checkout v4.8.0.0
cd host
mkdir build
cd build
cmake ../
make -j $(nproc)
make test # This step is optional
sudo make install
sudo ldconfig
sudo uhd_images_downloader
4-2. Build OAI gNB (E2 노드 포함해서 빌드)
# Get openairinterface5g source code
git clone https://gitlab.eurecom.fr/oai/openairinterface5g.git ~/openairinterface5g
cd ~/openairinterface5g
git checkout develop

# Install OAI dependencies (E2 노드 포함 빌드)
cd openairinterface5g/cmake_targets/
./build_oai -I  # if you never installed OAI, use this command once before the next line
#
./build_oai --gNB --nrUE --build-e2 --cmake-opt -DE2AP_VERSION=E2AP_V3 --cmake-opt -DKPM_VERSION=KPM_V3_00 --ninja

# nrscope dependencies
sudo apt install -y libforms-dev libforms-bin

# Build OAI gNB
cd ~/openairinterface5g/cmake_targets
./build_oai -w USRP --ninja --nrUE --gNB --build-lib "nrscope" -C
5. Deployment OAI gNB And nrUE
5-1. Near-RT RIC 설치 (FlexRIC)
# GCC Compiler
sudo apt update -y
sudo apt upgrade -y
sudo apt install -y build-essential
sudo apt install -y gcc-13 g++-13 cpp-13
sudo update-alternatives --install /usr/bin/gcc gcc /usr/bin/gcc-13 100 --slave /usr/bin/g++ g++ /usr/bin/g++-13 --slave /usr/bin/gcov gcov /usr/bin/gcov-13
sudo update-alternatives --config gcc # chose gcc-13

# Mandatory dependencies
sudo apt install libsctp-dev cmake-curses-gui libpcre2-dev

# Multi-language xApp requirements
git clone https://github.com/swig/swig.git
cd swig
git checkout release-4.1
./autogen.sh
./configure --prefix=/usr/
make -j8
sudo make install

# OAI RAN과 FlexRIC을 같은 머신에서 실행하는 경우
cd openairinterface5g/openair2/E2AP/flexric
git submodule init && git submodule update
# OAI RAN이 이전에 --build-e2 또는 -DE2_AGENT 옵션으로 컴파일되지 않은 경우에만 실행

# FlexRIC Installation
mkdir build && cd build && cmake -DE2AP_VERSION=E2AP_V3 -DKPM_VERSION=KPM_V3_00 .. && make -j8
sudo make install
ctest -j8 --output-on-failure   # flexric만 별도 test
6. RUN
6-1, OAI gNB (With RFSimulator) 동작
cd ~/openairinterface5g/cmake_targets/ran_build/build
sudo ./nr-softmodem -O ../../../targets/PROJECTS/GENERIC-NR-5GC/CONF/gnb.sa.band78.fr1.106PRB.usrpb210.conf --gNBs.[0].min_rxtxtime 6 --rfsim
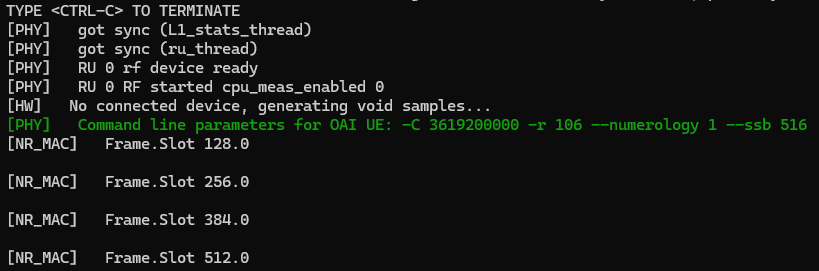

이렇게 CN5G와 상호작용하면서 GTP-U 터널이 만들어지고 NGAP 메시지를 주고받게 된다.

이후 E2 Agent를 세팅한 후, Setup-Request를 보내게 된다.
6-2. FlexRIC 동작
cd openairinterface5g/openair2/E2AP
./flexric/build/examples/ric/nearRT-RIC
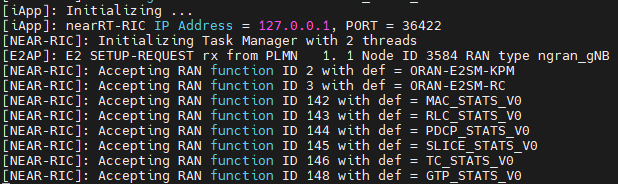
이런 상태에서 위 명령어로 FlexRIC을 실행하게 되면 Port 36422에서 Listen하고 있다가 E2 Setup Request를 받아 E2 node의 Setup이 이뤄진다.

(이때 gNB에서 Setup Response를 받았다는 로그를 띄우게 된다)
6-3. OAI nrUE (With RFSimulator) 동작
cd ~/openairinterface5g/cmake_targets/ran_build/build
sudo ./nr-uesoftmodem -r 106 --numerology 1 --band 78 -C 3619200000 --uicc0.imsi 001010000000001 --rfsim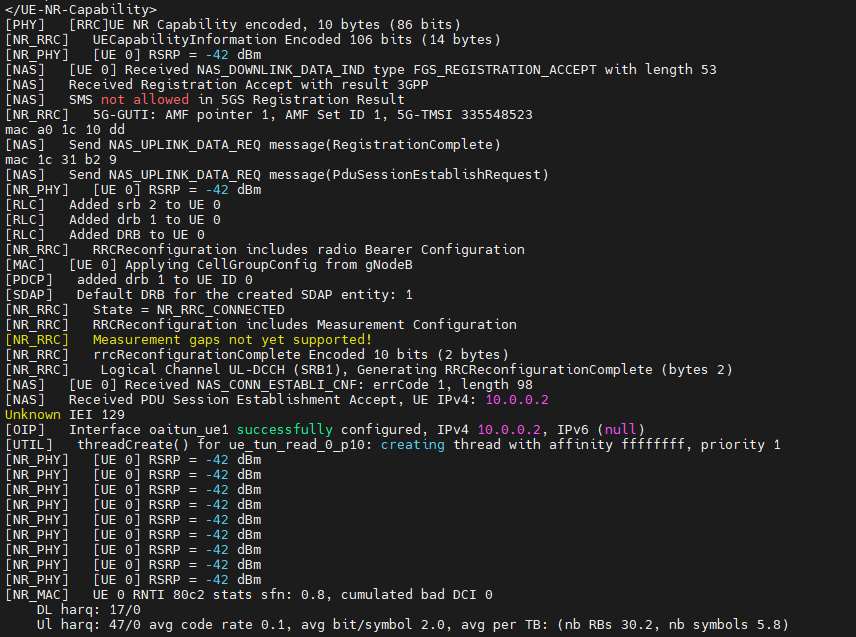
이 상황에서 UE를 띄우면, 우선 UE가 OAI CN5G 코어망에 자신의 존재를 알리고 성공적으로 등록되었다.
[NAS] Received Registration Aggcept 메시지가 위를 의미한다.
그 다음 [NAS] Received PDU Sessions Establishment Accept, UE IPv4: 10.0.0.2 라는 로그가 있다.
이는 UE가 데이터 통신을 위해 IP 주소인 10.0.0.2를 할당받았고, oaitun_ue1이라는 가상 네트워크 인터페이스도 생성되었다.
로그의 [RLC] Added drb1 to UE 0는 DRB(Data Radio Bearer), 즉 실제 사용자의 데이터를 실어나를 전용 통로가 UE와 gNB 사이에 설정되었음을 뜻한다.
이후 로그는 [NR_PHY] [UE0 0] RSRP = -42 dBm이라는 로그를 반복적으로 출력하게 되는데, 이는 UE가 gNB와의 연결을 안정적으로 유지하기 위해 지속적으로 무선 신호의 수신 강도(RSRP)를 측정하고 있음을 보여준다.
위 과정은, 스마트폰에서 전원을 켜서 5G 네트워크에 연결되고 안테나 아이콘이 가득 찬 상태와 같다.
이제 여기에서 앱을 실행해서 인터넷을 사용하면 되는 것이다.
6-4. xApp 동작
cd openairinterface5g/openair2/E2AP/flexric
XAPP_DURATION=30 ./build/examples/xApp/c/monitor/xapp_kpm_moni

여기에 FlexRIC에서 기본적으로 제공하는 monitoring xApp을 띄우면 위와 같은 메시지가 반복적으로 출력된다.
gNB가 1초 간격으로 indication 메시지를 보낸다.
UE ID type = gNB, amf_ue_ngap_id = 1, ran_ue_id = 1 부분은 이 데이터가 어떤 UE의 것인지 식별하는 정보.
DRB.PdcpSduVolumeUL = 1 [kb]는 Uplink (UE에서 gNB) 방향으로 측정된 데이터 양이다.
아마 이 부분은 UE가 보낸 Registration Request나 PDU Session Establishment Request와 같은 초기 접속 신호일 가능성이 크다. 2번째 Indication 메시지부터는 UL의 Volume이 측정되지 않는다.
DRB.UEThpUl = 1.73 [kb]는 위 데이터를 기반으로 계산한 Uplink의 Throughput이 1.73 kbps임을 의미한다.
RRU.PrbTotUl = 16071 [PRBs]는 측정 주기동안 Uplink 통신을 위해 할당된 총 물리적 자원 블록 (Physical Resource Block)의 수를 의미한다. 이는 곧 통신에 사용된 무선 자원의 양을 나타낸다.
즉, 이 xApp 로그는, O-RAN 아키텍처의 핵심인 E2 interface를 통해 RIC이 RAN의 성능을 실시간으로 들여다보는 과정.
우리만의 xApp을 만들어서 실제로 RAN의 성능을 확인할 뿐만 아니라 적절하게 제어해서 통신 환경을 개선하는 것도 가능함.
'RAN CN 테스트베드 구축 > OAI & FlexRIC (RAN)' 카테고리의 다른 글
| OpenAirInterface에서 gNB 역할을 하는 USRP (0) | 2025.10.24 |
|---|---|
| Near-RT RIC 오픈소스 플랫폼인 FlexRIC의 개념과 구조 (0) | 2025.10.16 |
| Window에서 Linux 사용하기 - wsl2 (0) | 2025.10.15 |
| Lab에서 쓸 수 있는 O-RAN Testbed 정리 (OAI, srsRAN) (2) | 2025.10.15 |
| O-RAN의 개념과 특징 (0) | 2025.10.15 |